

Step 1: Start Skins-n-More and set European Air War folder
Step 2: Setting up folders and texture files for use by Skins-n-More
Step 3: Registering and applying a texture in Skins-n-More
Step 4: Registering a terrain in Skins-n-More
Step 5: Registering a speech pack in Skins-n-More (German/UK/US voice files)
Side step: How to register a sound pack (Engine/gun/explosion/etc. sound files)
Step 6: Registering a menu and map in Skins-n-More
Step 7: Registering a theme in Skins-n-More
Step 8: Registering a campaign in Skins-n-More
Step 1: Start Skins-n-More and set European Air War folder
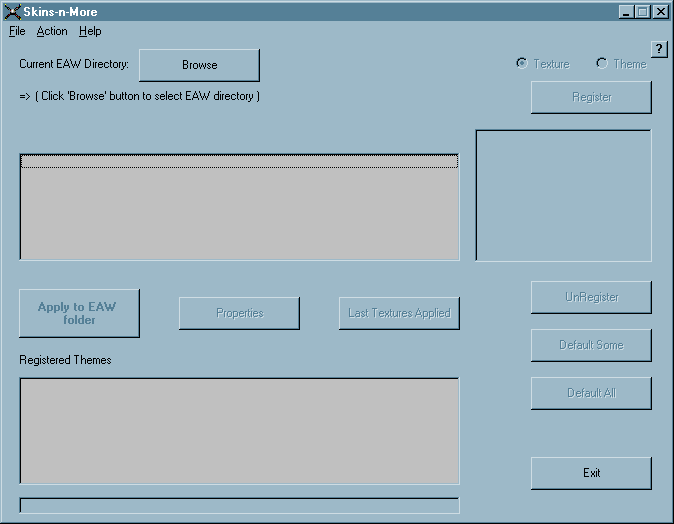
In this step, you start Skins-n-More for the first time. The application should look like the following:

First thing you need to do is tell Skins-n-More where the "European Air War" folder is. Click on the "Browse" button at the top left of the window. Navigate to the "European Air War" as shown below, then click "Open":
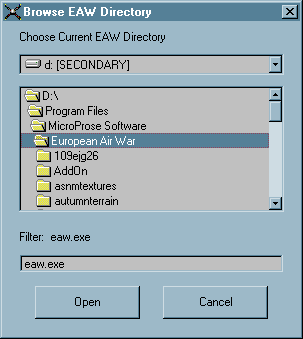
Assuming this is the first time you've set this as your "European Air War" folder, you should now get the following dialog:
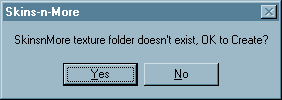
Click "Yes", and Skins-n-More will create a folder called "snmtextures" under the "European Air War" folder, as well as 36 sub-folders under that (to hold the actual texture files), and 4 empty database files (texinfrec.dat, texrecord.dat, themeinfrec.dat, themetexrec.dat). It is important that you DO NOT rename any of these sub-folders, as Skins-n-More is looking for these specific sub-folders during it's processing. Also, although the 4 database files are ASCII text files, and you can open them with a text editor like Notepad and view them, you are cautioned NOT to edit/change anything in them unless you are fully aware of their format and know exactly what you can and cannot change - otherwise you risk corrupting the database and rendering these files unusable.
Step 2: Setting up folders and texture files for use by Skins-n-More
Now you need to put the actual texture files you've downloaded from the various EAW skins web sites into appropraite folders for use by Skins-n-More. The easiest way is to use WinZip to create a sub-folder for a particular set of textures and unzip the entire contents into that folder - this is for one aircraft "skin", terrain, speech pack, or GUI pack.
Example one, you want to use one of Jamie Richards' skins in EAW, the beautiful Fw190a Trop JG2. After you've downloaded the .zip file, open it up (or open it from the site directly which will start and load WinZip):
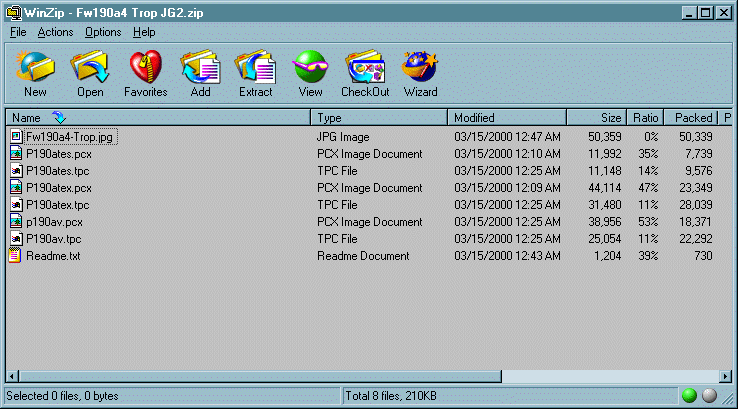
Next, click on the "Extract" toolbar button (this varies depending on which version of WinZip you have), and navigate to the "fw190a8" folder under "snmtextures":
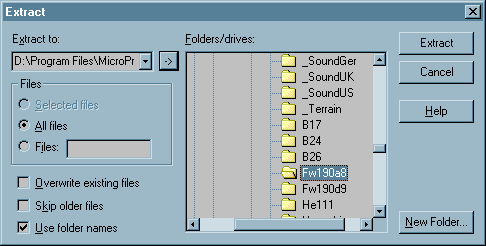
Click on the "New Folder" button to create a new folder under "Fw190a8" to hold Jamie's skin files, such as "Trop JG2":
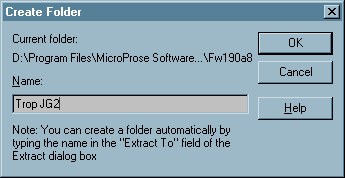
Click "OK", then click "Extract" when the previous screen comes up with the new folder:
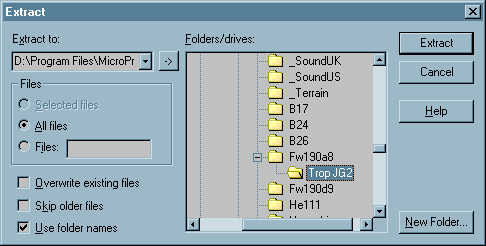
Now you are ready to register a new texture in Skins-n-More that will represent Jamie's Fw190a4 Trop JG2 skin. If you open up Windows Explorer, and traverse down to the "Fw190a8" sub-folder under "snmtextures", you should see something like the following:
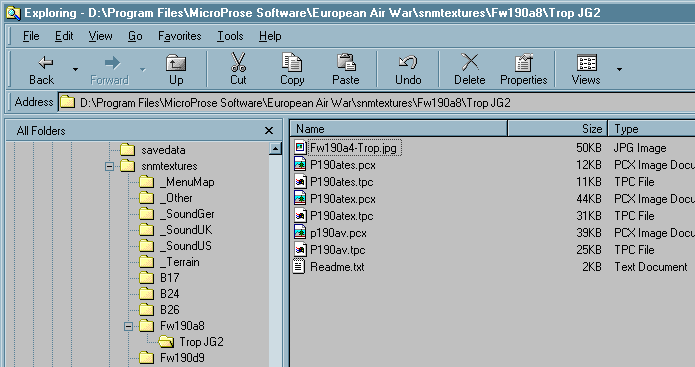
Step 3: Registering and applying a texture in Skins-n-More
Start Skins-n-More so the texture registration process can begin. Now that you've set the EAW folder, the main window should look something like this:
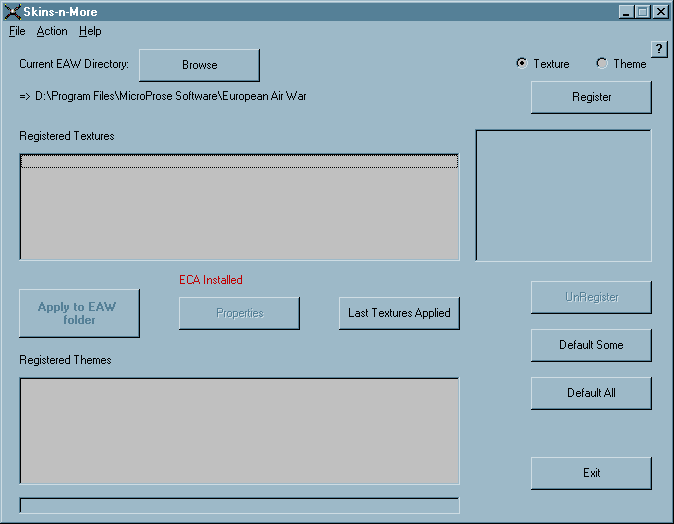
Make sure the "Texture" option button above the "Register" button is checked, then click the "Register" button. This will open the "Register Texture" window:
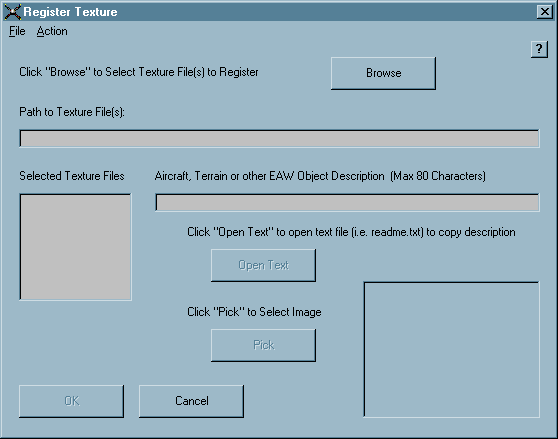
This is where you associate the files you just unzipped (in this example, Jamie's Fw190a4 Trop JG2 skin). Click the "Browse" button to open the "Choose Texture" dialog, and locate the texture files, using the drive and explorer tree view to navigate. You must double-click your left mouse button, or use the enter key if using the keyboard arrow keys in order for the "Select All" button to become active:
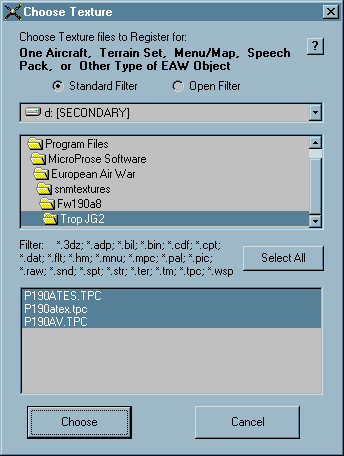
Once you've found the texture files, click the "Select All" button to select all of the files matching the filter listed in the middle of the dialog. In this case, the only files from Jamie's Fw190a4 skin that match the filter are the ".tpc" files. Click "Choose" to apply the selection, which will bring you back to the "Register Texture" window with some of the form fields filled in:
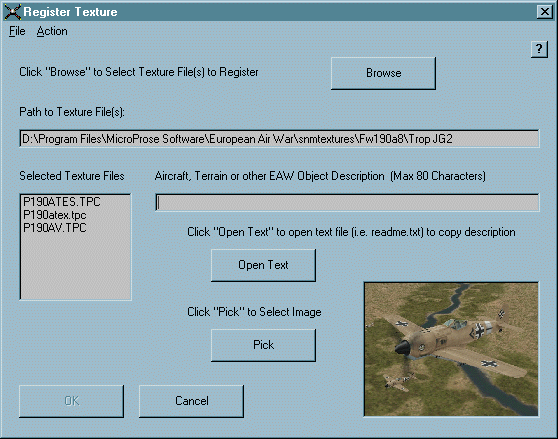
As you can see, the "Path" field is filled in based on what sub-folder you navigated to for the texture files, the "Selected Texture Files" list is filled in with the texture files you selected, and the thumbnail image has an image because one of the files extracted was a ".jpg" file (that you extracted to the same folder as the texture files) and Skins-n-More automatically loaded it. If you have more than one image (.bmp, .gif or .jpg only), you can also click the "Pick" button to select which one to display in the thumbnail:
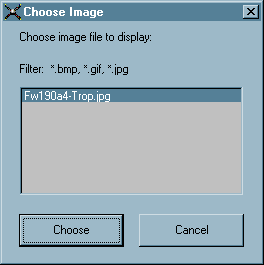
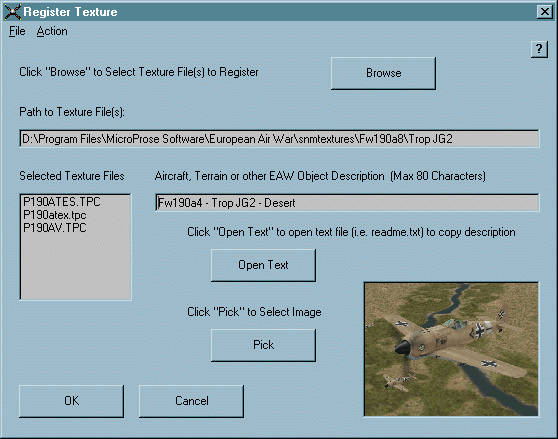
At this point, the only thing left to do is type a description of the skin in the description field, such as "Fw190a4 - Trop JG2 - Desert". This will also enable the "OK" button, allowing you to save the registered texture info:
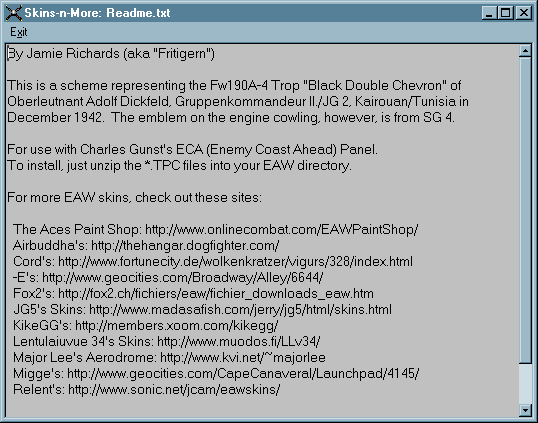
If you wanted to get more information about the skin, you could click the "Open Text" button which will allow you to open any files in the same folder as the textures with a ".txt" suffix. Many skin authors include a "readme.txt" file, and this zip file from Jamie is a good example:
After you click the "OK" button, you will be placed back in the main window, but with a new entry in the "Registered Textures" list in the upper half of the window, and the proper image (if the registered texture is selected) displayed in the thumbnail at the upper right of the window:
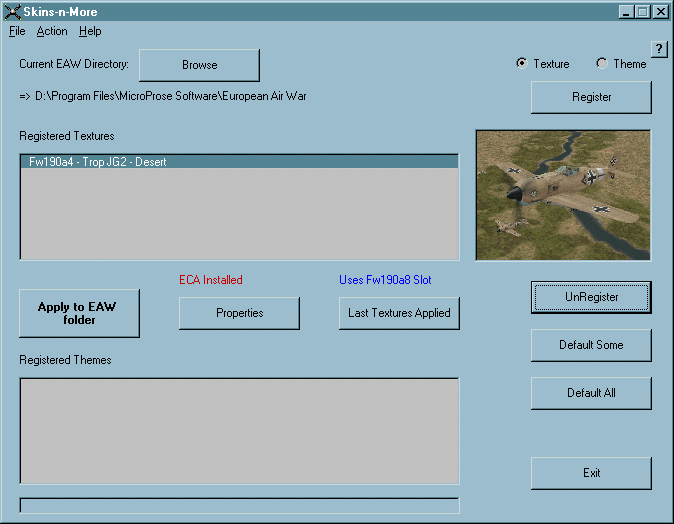
To apply (i.e. copy) this skin to the "European Air War" folder, simply doubleclick on the registered texture in the upper list, or click once to highlight the registered texture, then click "Apply to EAW folder". This will clean up any pre-existing .tpc and .3dz files for JUST the "Fw190a8" aircraft in the "European Air War" folder, then copy the texture files you associated with this registered texture into the same folder - see the table in the section on Skins-n-More's "pre-copy cleanup" for the list of files affected.
Side topic: What's this "pre-copy" clean up all about?
I'm sure many of you have seen this "pre-copy" clean up issue mentioned before, and wondered exactly what that meant. I'll try to explain it here.
One of my goals with Skins-n-More was to make the managing of skins as painless as possible. One way of doing this was to ensure that whenever a skin was applied (i.e. copied) to the European Air War folder, there wouldn't be any "leftovers" from a previous skin of the same aircraft, etc., that existed in that folder. An example of this is where the current skin included a cockpit view like a P51D winter (metal) skin. If you wanted to apply a different P51D skin, such as a green-based summer skin, the cockpit view texture might not be included in this set of copied files. This is because the skin author probably didn't include a cockpit view texture file with the package, since the default EAW P51D cockpit view worked just fine.
If Skins-n-More did not do a pre-copy cleanup of that plane's skin files (i.e. texture files), you'd have a green P51D from the outside, but from the cockpit view it would still have the metal wings from the previous skin, since that texture file would not have been removed. This holds true for all 30 aircraft, plus the terrain, speech packs (3), and GUI packs (i.e. menu/map). This is the reason you need to put your texture files in the correct sub-folder under "snmtextures", which is created for you under your "European Air War" folder when you first start Skins-n-More. By following the guidlines, you let Skins-n-More determine which files to remove in the pre-copy cleanup. Below is a table showing exactly which files in the European Air War folder are removed (if they exist) when you apply registered textures that have been placed in their appropriate "snmtextures" sub-folder.
This table also applies when you use the "Default Some" and "Default All" buttons. You'll notice that the "Default Some" button has a check box for each of the rows in the table below (except "Other"). This is because for each of the check boxes you check, the files listed on the right column of the table are removed from the European Air War folder. Clicking the "Default All" button removes all of the files listed on the right column. As explained in the "NOTE"s below, if ECA is installed in the European Air War folder, the appropriate files are restored to preserve ECA's integrity.
Table Showing Files Affected by Pre-Copy Clean Up and Default Processing
| Sub-folder under "snmtextures" where registered texture files are stored | Files removed from "European Air War" folder when registered texture applied |
|---|---|
| \B17 | pbb17*.tpc, pbb17*.3dz |
| \B24 | pb24*.tpc, pb24*.3dz |
| \B26 | pb26*.tpc, pb26*.3dz (See NOTE 1) |
| \Fw190a8 | p190a*.tpc, p190a*.3dz, vcg_190a.dat |
| \Fw190d9 | p190d*.tpc, p190d*.3dz, vcg_190d.dat |
| \He111 | ph111*.tpc, ph111*.3dz (See NOTE 1) |
| \Hur_mki (Hurricane) | phurr*.tpc, phurr*.3dz, vcg_hurr.dat |
| \Ju87 | pju87*.tpc, pju87*.3dz (See NOTE 1) | \Ju88a4 | pj88a*.tpc, pj88a*.3dz (See NOTE 1) |
| \Ju88c | pj88c*.tpc, pj88c*.3dz (See NOTE 1) |
| \Me109e4 | p109e*.tpc, p109e*.3dz, vcg_109e.dat |
| \Me109g6 | p109g*.tpc, p109g*.3dz, vcg_109g.dat |
| \Me109k4 | p109k*.tpc, p109k*.3dz, vcg_109k.dat |
| \Me110c | p110c*.tpc, p110c*.3dz, vcg_110c.dat |
| \Me110g | p110g*.tpc, p110g*.3dz, vcg_110g.dat |
| \Me262a | p262a*.tpc, p262a*.3dz, vcg_262a.dat |
| \Me410 | pm410*.tpc, pm410*.3dz (See NOTE 1) |
| \Mosquito | pmosq*.tpc, pmosq*.3dz (See NOTE 1) |
| \P38h | pp38h*.tpc, pp38h*.3dz, vcg_p38h.dat |
| \P38j | pp38j*.tpc, pp38j*.3dz, vcg_p38j.dat |
| \P47c | pp47c*.tpc, pp47c*.3dz, vcg_p47c.dat |
| \P47d | pp47d*.tpc, pp47d*.3dz, vcg_p47d.dat |
| \P51b | pp51b*.tpc, pp51b*.3dz, vcg_p51b.dat |
| \P51d | pp51d*.tpc, pp51d*.3dz, vcg_p51d.dat |
| \Spit14 | psp14*.tpc, psp14*.3dz, vcg_sp14.dat |
| \Spit2a (Spitfire 1a) | psp2a*.tpc, psp2a*.3dz, vcg_sp2a.dat |
| \Spitix (Spitfire 9) | psp09*.tpc, psp09*.3dz, vcg_sp09.dat |
| \Tempest | ptemp*.tpc, ptemp*.3dz, vcg_temp.dat |
| \Typhoon | ptyph*.tpc, ptyph*.3dz, vcg_typh.dat |
| \V1 | pv1v1*.tpc, pv1v1*.3dz |
| \_Terrain | *.ter, gras*.tpc, grnd*.tpc |
| \_SoundGer (Speech packs using German sound files) | ge*.snd, stgev*.str, grank*.str, gerfname.str, gerlname.str, radio.txt (See NOTE 2) |
| \_SoundUK (Speech packs using British sound files) | uk*.snd, stuk*.str, brank*.str, brtfname.str, brtlname.str, radio.txt (See NOTE 2) |
| \_SoundUS (Speech packs using American sound files) | us*.snd, stus*.str, arank*.str, amrfname.str, amrlname.str, radio.txt (See NOTE 2) |
| \_MenuMap (EAW main menu screen, aircraft selection screens, and in-flight maps) | *.pic |
| \_Other | Nothing is deleted from the European Air War folder (See NOTE 3) |
NOTE 1 : If ECA is installed in the European Air War folder, Skins-n-More will restore the appropriate .3dz files for these 7 flyable ECA aircraft right after it removes the files indicated in the right column above. Then the appropriate files are copied to the European Air War folder based on which registered texture was "applied".
NOTE 2 : If ECA is installed in the European Air War folder, Skins-n-More will restore the radio.txt file from ECA.
NOTE 3: When you put texture or other (eg. speech pack) files under the "_Other" sub-folder (or any folder where none of the ones described above is in the path), there is no pre-copy clean up. This is important to note, as any time you apply a registered texture who's files are located here, the only action is those files being copied to the European Air War folder.
This concludes the "pre-copy" clean up topic - I hope it makes more sense now!
Side step: How to register detailed instruments
One of the more popular things to do with EAW is to use texture files that contain sharpened/detailed instrument views. With Skins-n-More, it's easy to create a registered texture of these sharpened instrument files.
In this example, I'll show you how you go about registering detailed instrument textures. Much of the process is the same as "Step 2: Setting up folders and texture files for use by Skins-n-More" above, so I won't repeat it here. Please refer to that section if you need assistance, as necessary. Since there is an instrument view texture file for each aircraft, the recommended place to store these files is in a sub-folder of the "_Other" folder beneath "snmtextures". Otherwise, you could always include a detailed instrument texture file with each "skin" you download, but that would be a lot of work. Use Winzip or a comparable utility to unzip your instrument texture files, such as the set of detailed instrument textures from the 666th site. As in my example below, put the ".tpc" files (as well as the .3dz file for the thin P47C bar for TNT video cards if applicable) into a new folder called "666th cockpits" (or what makes sense for you) under "_Other".
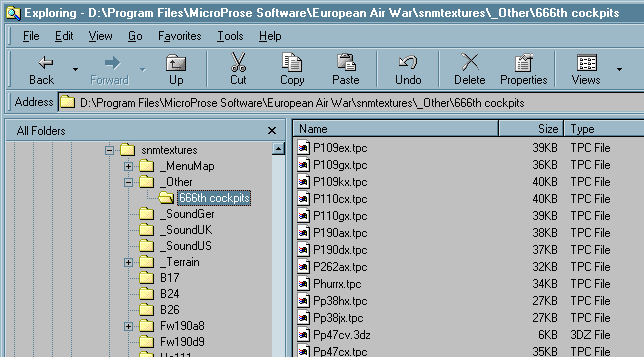
Next, from the Skins-n-More main window, click the "Register" button after making sure the "Texture" option button above it is checked. Once in the "Register Texture" window, click the "Browse" button, navigate to the folder where you put the detailed instrument texture files (see above), and click the "Select All" button, then click "Choose" to bring you back to the "Register Texture" window below:
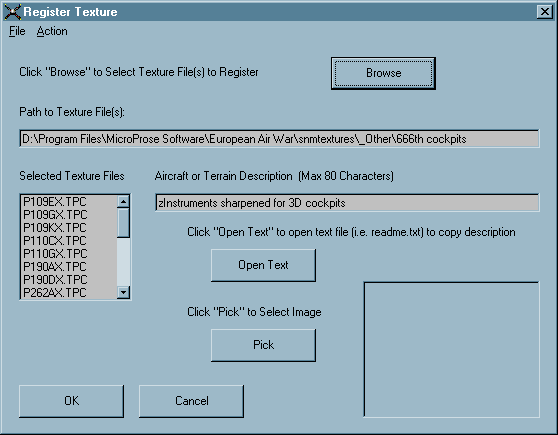
Click "OK" to save the detailed instruments registered texture.
Important! There are two very important things to remember when registering detailed instrument files. First thing is the fact that I'm suggesting you put the texture files under the "_Other" sub-folder under "snmtextures". The second thing you'll notice is the strange way I started the description with a "z".
The reason for putting detailed instrument textures under "_Other" is that all aircraft can have detailed instruments. Since you don't want to remove all texture files for a particular aircraft from the European Air War folder when you apply (i.e. copy) detailed instruments, you want Skins-n-More to simply copy the texture files you've registered... and nothing more. As noted in the table in the previous section - "Side topic: What's this "pre-copy" clean up all about?" - Skins-n-More will not do any pre-copy cleanup if a registered texture's files are stored in the "_Other" sub-folder under "snmtextures".
The reason for starting the description with a "z" is to make sure that this registered texture falls last in the alphabetically sorted upper list in the main Skins-n-More window. More specifically, the goal is to ensure this registered texture is listed after any and all registered textures who's files are not in the "_Other" sub-folder under "snmtextures". This is crucial when registering themes, as I'll describe in a later section. The short of it is, if you don't do this, the detailed instrument textures may get deleted from the European Air War folder by the pre-copy clean up process when applying a theme later on.
If you wish to avoid this issue all together, you can use a different method - simply copy all detailed instruments to the European Air War folder, then change the attributes of each of the instrument texture files to "read only" (by right mouse clicking each of the files while using Windows Explorer and clicking "Properties"). This way, the instrument files will always remain in the European Air War folder. You don't need to use Skins-n-More with detailed instrument files if you use this method.
This concludes the "How to register detailed instruments" section.
Step 4: Registering a terrain in Skins-n-More
In this example, I'll show you how you go about registering a terrain in Skins-n-More. Much of the process is the same as "Step 2: Setting up folders and texture files for use by Skins-n-More" above, so I won't repeat it here. Please refer to that section if you need assistance, as necessary.
Skins-n-More is designed to do a pre-copy clean up of terrain textures, as long as you put the terrain texture files under the "_Terrain" sub-folder under "snmtextures" - see the table in the section on Skins-n-More's "pre-copy cleanup" for the list of files affected. Use Winzip or a comparable utility to unzip your terrain texture files, such as the winter terrain from Paul Wilson. As in my example below, put the terrain ".ter" files into a new folder called "Winter by Paul Wilson" (or what makes sense for you) under the "_Terrain" sub-folder.
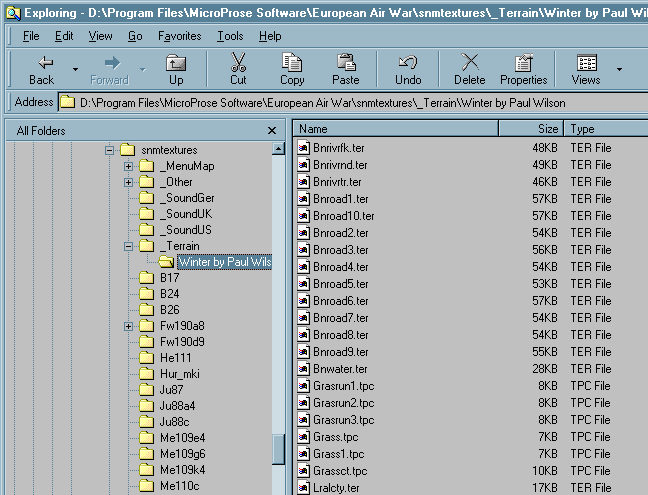
Now that you have set up the correct sub-folder, you may want to add some other texture files. In this example, you probably want to also include the snow covered airfield textures that MajorLee created (or if this is a desert or mediterranean terrain, copy the approprate airfield texture files in). Put those files here - they include: grasrun1.tpc, grasrun2.tpc, grasrun3.tpc, grass.tpc, grass1.tpc, and grassct.tpc. Also, (although they don't make sense for a winter terrain ;-) you can add palm tree texture files, which include: grnd07.tpc, grnd07s.tpc, grnd09.tpc, grnd11.tpc and grnd11s.tpc (or other ground object texture files). I recommend handling weather files a little differently - which I'll explain in the next section.
Next, from the Skins-n-More main window, click the "Register" button after making sure the "Texture" option button above it is checked. Once in the "Register Texture" window, click the "Browse" button, navigate to the folder where you put the terrain texture files (see above), and click the "Select All" button, then click "Choose" to bring you back to the "Register Texture" window below:
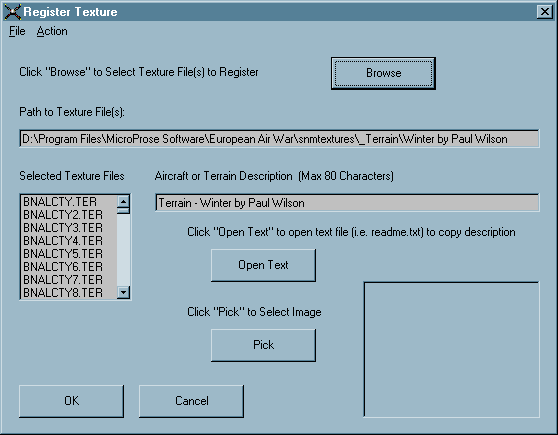
Click "OK" to save the terrain registered texture.
For the description, I recommend starting all terrain descriptions with "Terrain", so that they are all grouped together in the list of registered textures in the Skins-n-More main window. Now when you apply this terrain, all previous terrain texture files in the European Air War folder will be removed (as detailed in the table in a previous section, this includes: *.ter, gras*.tpc, grnd*.tpc), and the new terrain, complete with airfield and palm tree (if applicable) texture files will be copied to the European Air War folder!
This concludes "Step 4: Registering a terrain in Skins-n-More".
Side step: How to register weather
In this example, I'll show you how you go about registering weather in Skins-n-More. Much of the process is the same as "Step 2: Setting up folders and texture files for use by Skins-n-More" above, so I won't repeat it here. Please refer to that section if you need assistance, as necessary.
I'm recommending that you handle weather files differently than combining them with terrain files and registering them in conjuction with the terrain textures. The main reason is so you don't have to put weather files in each terrain you register with Skins-n-More. This would require you to duplicate a terrain set for each variation of the weather you wanted to have available - there's an easier way.
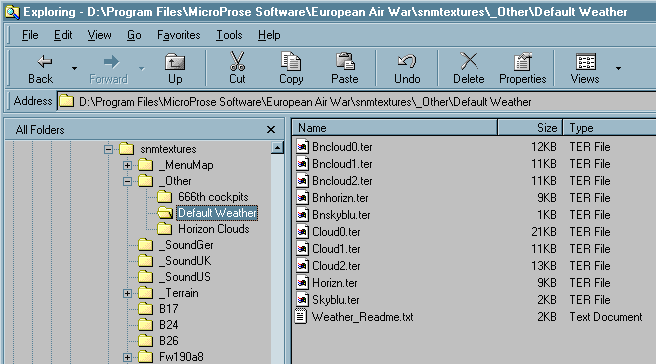
The first step is to download a set of "default" weather files. (a lot of this process is explained in the readme). These are default EAW weather files that I've extracted from EAW's Terrain.cdf using Paulo Morais' CDF extractor. Use Winzip or a comparable utility to unzip these default weather texture files into a new folder called "Default Weather" (or what makes sense for you) under the "_Other" folder, as you see below:
Next, from the Skins-n-More main window, click the "Register" button after making sure the "Texture" option button above it is checked. Once in the "Register Texture" window, click the "Browse" button, navigate to the folder where you put the weather texture files (see above), and click the "Select All" button, then click "Choose" to bring you back to the "Register Texture" window below:
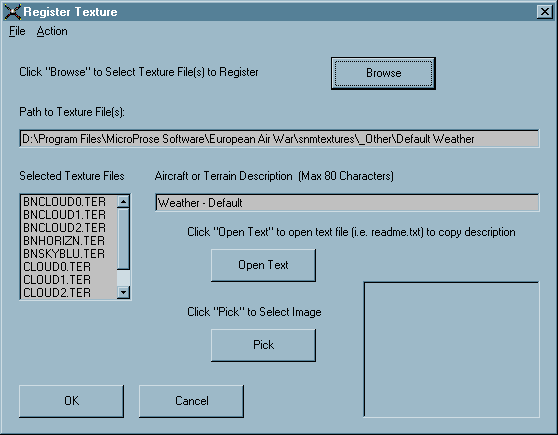
Click "OK" to save the default weather registered texture.
Like the detailed instruments registered texture, make sure you start the description with a letter that moves the registered texture to the bottom of the alphabetized list of registered textures in the main window. I've found that starting all weather registered textures with "Weather - " is good enough. The reason is the same as for the detailed instruments. You want the weather registered textures to fall last in the alphabetically sorted upper list in the main Skins-n-More window. More specifically, the goal is to ensure this registered texture is listed after any and all registered textures who's files are not in the "_Other" sub-folder under "snmtextures". Again, this is crucial when registering themes, as I'll describe in a later section. The short of it is, if you don't do this, the weather textures may get deleted from the European Air War folder by the pre-copy clean up process when applying a theme later on.
Now that you have a "default weather" registered texture, use the same process for any custom weather files - with two differences:
First, now that you have a folder with default weather files, simply create another folder under "_Other" which will contain a custom weather - such as "Horizon Clouds" for Pretzel's horizon cloud weather files. Now copy the contents of the "Default Weather" folder into this new folder.
Second, now that the custom weather folder - in this case "Horizon Clouds" - has default weather files, copy the specific custom weather files into the same folder, overwriting the default. In the case of Pretzel's horizon clouds, the only file affected is "bnhorizn.ter". Now, the "Horizon Clouds" represents the EAW default weather but with horizon clouds. The folder should look like the following:

Now, back in the Skins-n-More main window, click the "Register" button after making sure the "Texture" option button above it is checked. Once in the "Register Texture" window, click the "Browse" button, navigate to the folder where you put the custom "Horizon Clouds" weather texture files (see above), and click the "Select All" button, then click "Choose" to bring you back to the "Register Texture" window below:
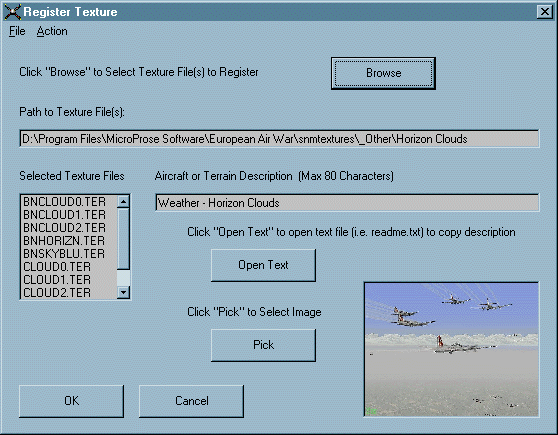
Click "OK" to save the horizon clouds weather registered texture.
Repeat this last step for each custom weather you want to set up in Skins-n-More.Remember to always start with the "Default Weather" textures and overwrite those files with the particular custom weather files you've downloaded.
The reason is this: Since there is no pre-copy clean up for weather files (they're under the "_Other\..." folder, right?), you want to make sure that each time you apply (i.e. copy) a weather registered texture to the European Air War folder, all previous weather textures are overwritten with the default weather texture files, plus your custom weather texture files.
This concludes "Side step: How to register weather".
Step 5: Registering a speech pack in Skins-n-More(German/UK/US voice files)
In this example, I'll show you how you go about registering a speech pack in Skins-n-More. Much of the process is the same as "Step 2: Setting up folders and texture files for use by Skins-n-More" above, so I won't repeat it here. Please refer to that section if you need assistance, as necessary.
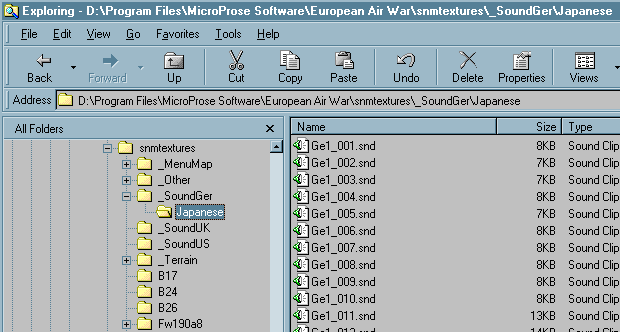
By "speech pack", I'm refering specifically to those such as Jamie Richard's Japanese speech pack, or E's scratchy British speech pack, etc. - not Meatwater's sound pack (which I'll cover in the next section). Here are the steps to register Jamie's Japanese speech pack in Skins-n-More. First, use Winzip or a comparable utility to unzip the Japanese speech pack into a new folder under "...\snmtextures\_SoundGer" - such as "Japanese". You need to put the files under the "_SoundGer" folder since the the Japanese voices are replacing the German voices in the game - as in the example below:
Next, from the Skins-n-More main window, click the "Register" button after making sure the "Texture" option button above it is checked. Once in the "Register Texture" window, click the "Browse" button, navigate to the folder where you put the speech pack files (see above), and click the "Select All" button, then click "Choose" to bring you back to the "Register Texture" window below:
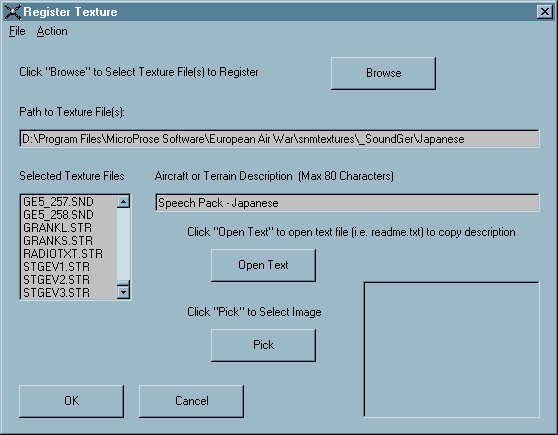
Click "OK" to save the speech pack registered texture.
Speech packs are one of those EAW "objects" that Skins-n-More will perform a pre-copy clean up for, if you've placed the files in the appropriate folder. If you look at the table in the section on Skins-n-More's "pre-copy cleanup", you'll see that it will clean up the following files from the Europoean Air War folder if you apply another German speech pack (or "default" the German speech pack): ge*.snd, stgev*.str, grank*.str, gerfname.str, gerlname.str, radio.txt. This was done to include those files likely to be in a speech pack using the German speech-related EAW files - as you can see from the Skins-n-More image above (in the "Selected Texture Files" list box at the left).
To register other "Axis" speech packs, you need to create other sub-folders under "_SoundGer" and follow the same steps as outlined above. For replacement American or British speech packs, create sub-folders under "_SoundUS" and "_SoundUK" respectively, and follow the same steps as outlined above (replacing "_SoundGer" with "_SoundUS" or "_SoundUK" as appropriate)..
This concludes "Step 5: Registering a speech pack in Skins-n-More".
Side step: How to register a sound pack (Engine/gun/explosion/etc. sound files)
In this example, I'll show you how you go about registering a sound pack in Skins-n-More (or specific sound files - other than German/UK/US speech packs like those from Jamie Richards or E). Much of the process is the same as "Step 2: Setting up folders and texture files for use by Skins-n-More" above, so I won't repeat it here. Please refer to that section if you need assistance, as necessary.
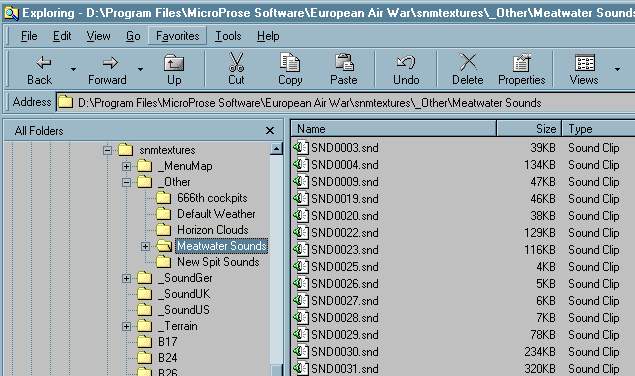
Although Skins-n-More does not perform pre-copy cleanup on sound files like those found in Meatwater's sound pack, you can still register those sounds like other EAW "objects". First I'll show you how to register Meatwater's sound pack, then show you how you might register variations of this sound pack. Use Winzip or a comparable utility to unzip Meatwater's sound files into a new folder called "Meatwater Sounds" (or what makes sense for you) under the "_Other" folder, as you see below:
Next, from the Skins-n-More main window, click the "Register" button after making sure the "Texture" option button above it is checked. Once in the "Register Texture" window, click the "Browse" button, navigate to the folder where you put the Meatwater sound pack files (see above), and click the "Select All" button, then click "Choose" to bring you back to the "Register Texture" window below:
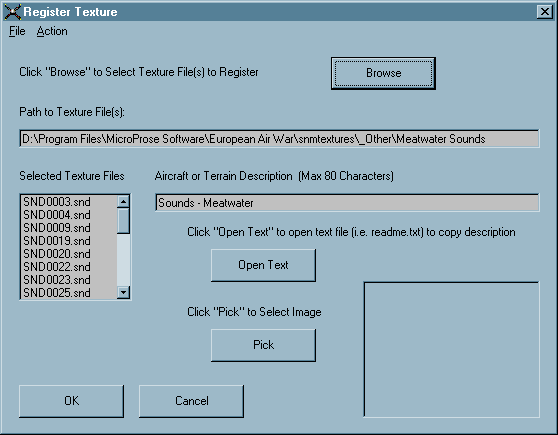
Click "OK" to save the speech pack registered texture.
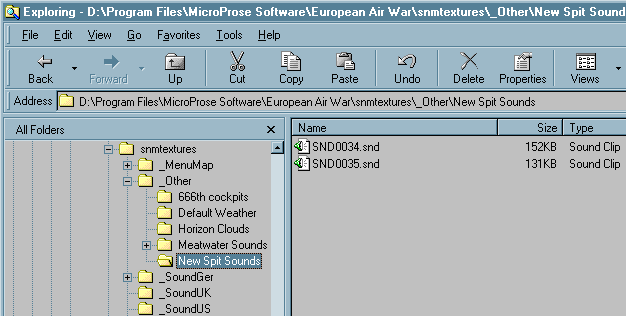
Since there is no pre-copy clean up done, applying this registered texture will simply copy these Meatwater sound pack files into the European Air War folder. Lets do another example where you wanted a slight variation - new Spitfire sounds (from Bilko/Donster) to replace the inline engine sounds. First, use Winzip or a comparable utility to unzip the replacement sound files into a new folder called "New Spit Sounds" (or what makes sense for you) under the "_Other" folder, as you see below:
Next, from the Skins-n-More main window, click the "Register" button after making sure the "Texture" option button above it is checked. Once in the "Register Texture" window, click the "Browse" button, navigate to the folder where you put the new Spitfire sound files (see above), and click the "Select All" button, then click "Choose" to bring you back to the "Register Texture" window below:
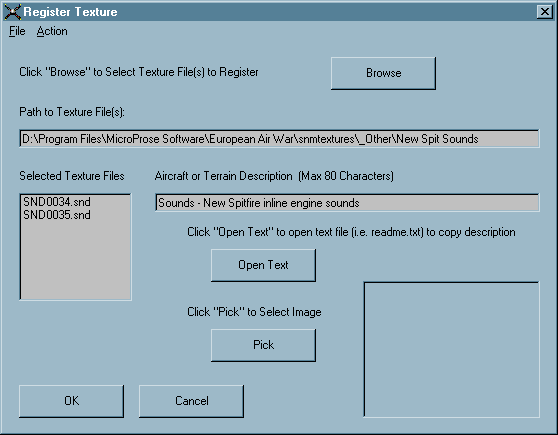
Click "OK" to save the new Spitfire inline engine sounds registered texture.
Now when you apply this second registered texture, only the inline engine sounds will be overwritten with the new files. To go back to Meatwater's inline engine sounds, simply re-apply the previously registered Meatwater sound pack registered texture. You can repeat this second example for any other variation of Meatwater's sound pack (or other sound pack you're using) - simply create another sub-folder under "_Other" and include just the sounds you want (i.e. .50 caliber mg sounds, 20mm sound, etc.).
This concludes "Side step: How to register a sound pack ".
Step 6: Registering a menu and map in Skins-n-More
In this example, I'll show you how you go about registering a main menu screen, aircraft selection screens, and in-flight map in Skins-n-More. Much of the process is the same as "Step 2: Setting up folders and texture files for use by Skins-n-More" above, so I won't repeat it here. Please refer to that section if you need assistance, as necessary.
Skins-n-More is designed to do a pre-copy clean up of main menu screen, aircraft selection screen, and in-flight map textures (i.e. files ending with "*.pic"), as long as you put the files under the "_MenuMap" sub-folder under "snmtextures" - see the table in the section on Skins-n-More's "pre-copy cleanup" for the list of files affected. Use Winzip or a comparable utility to unzip your main screen, aircraft selection screens, and in-flight map texture files (hereafter referred to as "menu/map"), such as those from Mosi, Shatter of Worlds and -E. As in my example below, put the ".pic" files into a new folder called "Russian Front - Winter" (or what makes sense for you) under the "_MenuMap" sub-folder.
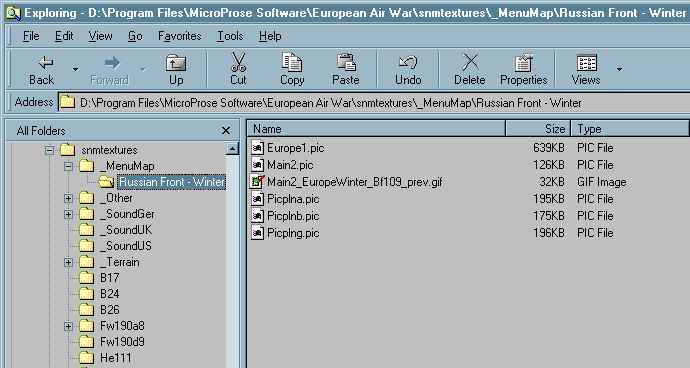
As you can see from the example above, I've included a main menu screen ("Main2.pic"), all three aircraft selection screens (American a/c: "Picplna.pic", British a/c: "Picplnb.pic", and German a/c: "Picplng.pic") and the in-flight map ("Europe1.pic"). Like any other registered texture, you can also include an image to represent your menu/map.
Next, from the Skins-n-More main window, click the "Register" button after making sure the "Texture" option button above it is checked. Once in the "Register Texture" window, click the "Browse" button, navigate to the folder where you put the menu/map texture files (see above), and click the "Select All" button, then click "Choose" to bring you back to the "Register Texture" window below:
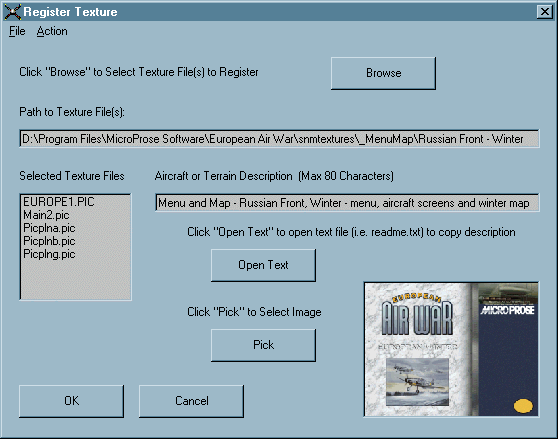
Click "OK" to save the menu/map registered texture.
This example is handy for including with a winter Russian front theme, since the correct aircraft selection screens will show, along with a winterized in-flight map, and a more appropriate main menu screen. If, for example, you've correctly set up the Russian front flight models within Charles Gunst's ECA Panel and have the correct skins/terrain/etc. in your theme, the menu/aircraft selection screens/in-flight map should correspond to that theater and aircraft.
You don't have to include all of the files above for each menu/map registered texture. If you only wanted to have a different main menu screen, you can simply register the "Main2.pic" texture file, and nothing else would change. I've done this for my ETO/summer themes, where the default aircraft selection screens and in-flight map were fine, and I only wanted to change the main menu screen.
This concludes "Step 6: Registering a menu and map in Skins-n-More".
Step 7: Registering a theme in Skins-n-More
In this example, I'll show you how you go about registering a theme in Skins-n-More. You use themes to manage entire sets of skins, terrain, and other EAW objects, and apply them to the EAW folder with one click. Think of a theme as representing an entire theater of operations for EAW (i.e. western Europe, eastern Europe, Pacific theater, Mediterranean, North Africa, etc.), in a specific season (winter, spring, summer, fall), with specific aircraft paint schemes, aircraft 3d models, terrains, weather, ground objects, airstrips, etc. that make sense for those theaters and seasons.
NOTE: Themes are totally dependent on textures you previously registered using the "Register Texture" window: Without registered textures, you can't create a theme.
I will create a theme called "Winter Transition in Western Europe, ECA Default". This theme will contain winterized skins, terrain, etc. I've previously registered using the "Register Texture" window. From the Skins-n-More main window, click the "Register" button after making sure the "Theme" option button above it is checked. This will open the "Register Theme" window:
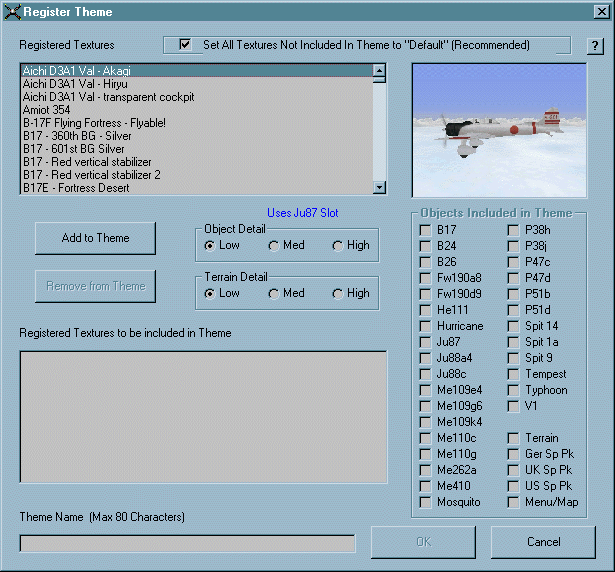
Before I begin creating the theme, lets go over the different controls in the "Register Theme" window (you can also click the little "?" button at the top right of this window - and on most windows - to learn more):
The upper list box is basically the same as the upper "Registered Texture" list box in the main window. It shows the current list of textures you've previously registered with Skins-n-More. As you click on any of the items in the list, the thumbnail image at the upper right shows any image associated with that registered texture, if there is one.
The lower list box shows what registered textures are to be included in the theme you are creating. In the screen above, I haven't chosen any registered textures, so the list is blank.
To the right, you see a bunch of check boxes. These are not interactive, they are merely informational. If you look closely, each check box represents each of the subfolders Skins-n-More created under the "snmtextures" folder (except the "_Other" folder). What this shows you is which one skin from each of the 30 base aircraft you have already included in the theme, as well as which one terrain, German/UK/US speech pack, and menu/map registered texture has been included in the theme. The key word here is "one". Skins-n-More only allows you to add one registered texture for each of these 35 objects. The exception is any registered texture stored under the "_Other" folder (under "snmtextures"). This exception allows you to add as many other registered textures as you want that don't fit these 35 object categories (i.e. weather, ground objects, engine/aircraft sounds, gunsights, etc.)
If you look in between the upper and lower list, you see two sets of radio buttons. The "Object Detail" radio button values of "Low", "Med", and "High" correspond to a value of "0", "1", and "2" in the EAW.INI entry: "3dCityTargets=". This affects how objects such as trees, buildings, etc. are displayed in the game. The "Terrain Detail" radio button values of "Low", "Med", and "High" correspond to a value of "0", "1", and "2" in the EAW.INI entry: "TerrainDetail=". This affects how close to your airplane the terrain details come into view while playing the game. When the theme is applied to the "European Air War" folder (by selecting a registered theme in the lower list of the main window and clicking "Apply to EAW folder"), Skins-n-More will modify the two entries above in the EAW.INI file based on the radio buttons you chose. This can be very handy if your theme represents the Pacific theater, or a desert environment, as you probably don't want any ground objects such as trees or buildings to be displayed in the game.
Lastly, you will see a checkbox at the top of the window: "Set All Textures Not Included In Theme to 'Default' (Recommended)". What this does is tell Skins-n-More that when you apply this theme it should first clean up the European Air War folder of previously applied textures. In reality, what's actually happening is that Skins-n-More is performing the exact same processing as if you pressed the "Default All" button on the main window - BEFORE applying the registered textures in the theme.
OK, now that I've given you an overview of the controls in the "Register Theme" window, lets create the theme!
In my example, the first thing I want to do is scroll down the upper list, and start adding winter skins and terrain to the theme. You can do this by either double-clicking on a registered texture, or clicking once on a texture and clicking the "Add to Theme" button. As you start adding textures, you'll notice two things: registered textures will begin filling up the lower list, and the checkboxes to the right will begin getting checked, as below:
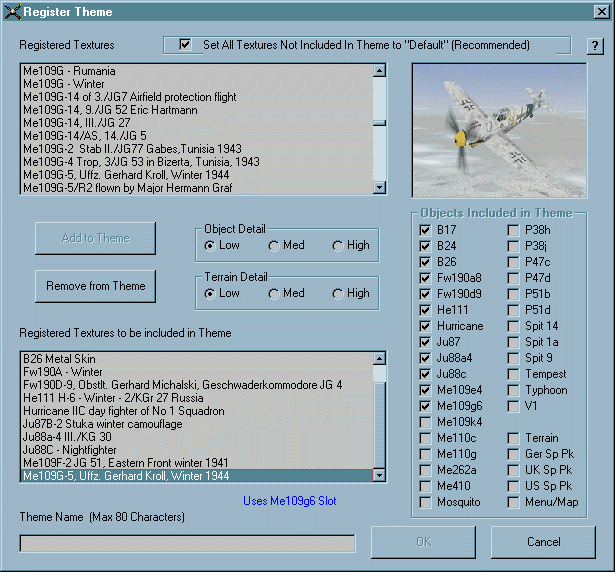
In this case, I'm just going down the upper list - which is sorted alphabetically like the lists in the main window - and adding skins in a sequential fashion. As you can see, I just added an Me109.
This concludes "Step 7: Registering a theme in Skins-n-More".
Step 8: Registering a campaign in Skins-n-More
In this example, I'll show you how you go about registering Pacific Tide 2.0 with Skins-n-More 2.0.
One note, my installation assumed ECA was not installed in my EAW directory. I use Scorpions ECA_Enabler 2.0 to change to vanilla EAW 1.2.
If you're starting out with an EAW directory that has ECA,
you'll need to do a little more work to create a registered texture with all of the ECA files, but that's pretty much it.
I recommend using Enabler or other FM switcher to take care of that, personally, but it's up to you.
OK, on with the steps I used. Please note that I did NOT use the "use folder names" option in Winzip - when I uncompressed each of the archives,
I put everything into the same directory (not all together, but for each file).
Configure Skins-n-More:
Do this once.
1) Unzip the contents of "Campaigns.zip" into the following folder:
...\snmtextures\_Other\PTide\Campaigns_Guadalcanal
...\snmtextures\_Other\PTide\Campaigns_Solomons
You'll notice I specify two folders... you need to separate out the files in the .zip file, but with WinZip you can simply click on the "Path"
column to sort/group them. You don't need the .jpg or .txt files, but you can store them in the respective sub-folders if you want.
Create a registered texture for each of these folders with Skins-n-More -
I called them "Campaign - Pacific Tide 2.0 - Guadalcanal Campaign" and "Campaign - Pacific Tide 2.0 - Solomons Campaign" respectively.
This way, all of the PTide registered textures will be grouped together in the main registered texture list (main window upper list).
2) Unzip the contents of "Careertp.zip" into the following folder:
...\snmtextures\_Other\PTide\Career
Create a registered texture for this folder with Skins-n-More - I called it "Campaign - Pacific Tide 2.0 - Career".
3) Unzip the contents of "Frontlines.zip" into the following folders:
...\snmtextures\_Other\PTide\Frontline_Guadalcanal
...\snmtextures\_Other\PTide\Frontline_Solomons
There are two "frntline.dat" files, so you need to select/extract each one individually
based what you see in the path column. Create a registered texture for each of these folders with Skins-n-More -
I called them "Campaign - Pacific Tide 2.0 - Guadalcanal Frontline" and "Campaign - Pacific Tide 2.0 - Solomons Frontline" respectively.
4) Unzip the contents of "Game Files.zip" into the following folder:
...\snmtextures\_Other\PTide\GameFiles
Create a registered texture for this folder with Skins-n-More - I called it "Campaign - Pacific Tide 2.0 - Game Files".
5) Unzip the contents of "High Res Terrain.zip" into the following folder:
...\snmtextures\_Other\PTide\HiResTerrain
Create a registered texture for this folder with Skins-n-More - I called it "Campaign - Pacific Tide 2.0 - Hi Res Terrain".
6) Unzip the contents of "Plane Pack.zip" into the following folder:
...\snmtextures\_Other\PTide\PlanePack
Create a registered texture for this folder with Skins-n-More - I called it "Campaign - Pacific Tide 2.0 - Plane Pack".
7) Unzip the contents of "Speach.zip" into the following folder:
...\snmtextures\_Other\PTide\SpeechPack
Create a registered texture for this folder with Skins-n-More - I called it "Campaign - Pacific Tide 2.0 - Speech Pack".
8) Create a "Pacific Tide 2.0 - Guadalcanal" theme. Include the following registered textures (that you created above):
Campaign - Pacific Tide 2.0 - Career
Campaign - Pacific Tide 2.0 - Game Files
Campaign - Pacific Tide 2.0 - Guadalcanal Campaign
Campaign - Pacific Tide 2.0 - Guadalcanal Frontline
Campaign - Pacific Tide 2.0 - Hi Res Terrain
Campaign - Pacific Tide 2.0 - Plane Pack
Campaign - Pacific Tide 2.0 - Speech Pack
I also included one of PapaRomeo's gunsights as I didn't see a gunsight.spt anywhere in the .zip files.
I recommend checking the "low" object detail radio button (terrain detail to your taste), and the "set all textures not included in theme to
'default'" checkbox on the top. The latter will ensure that a "Default All" process occurs before the theme is applied.
You also need to create a theme called "Pacific Tide 2.0 - Solomons".
The easiest way is to highlight the theme above, then click properties. Change the two "Guadalcanal" registered textures to the "Solomons"
textures (i.e. campaign and frontline), then change the "Guadalcanal" in the theme name to "Solomons". When you click OK, click the "No"
button to save as a new theme, and you're done.
9) Create the following "user defined" default objects by clicking the "Default Some" button on the main window, clicking the "user defined" tab,
and clicking "add object":
Object Name: Pacific Tide 2.0 Clean Up #1 (No ECA)
Object Filter: a*.dat, camp*.dat, frnt*.dat, grid*.dat, load*.dat, mis*.dat, plan*.dat, sq*.dat, t*.dat, w*.dat
Object Name: Pacific Tide 2.0 Clean Up #2 (No ECA)
Object Filter: *.flt, *.mpc, grb*.snd, ge*.snd, uk*.snd, us*.snd, *.str, *.wsp
I had to use two because the object filter text box is limited to 100 characters. These default filters will help you clean up the EAW
directory after you're done playing PTide.
Apply the Theme in Skins-n-More:
Do this only when your EAW directory is not set up with PTide and you want to play PTide.
1) Open Skins-n-More, click on either of the two themes you created above, then click the "Apply" button, and your done - go play.
Clean up your EAW directory:
When you're done with PTide and want to clean up your EAW directory, open up Skins-n-More and click the following:
1) Default All
2) Default Some - within this window, click the "user defined" tab, check the two "Pacific Tide..." default objects, then OK
You should now be back to vanilla EAW 1.2.
This concludes "Step 8: Registering a campaign in Skins-n-More".